This is my explanation of my project to control a Gameboy printer with a Parallax Propeller.
I found the code and schematic by Joe Grand to interface a Parallax Propeller with the Gameboy Printer.
I had an extra WiiChuck adapter that I thought would work with the Gameboy Link Cable, but I had to sand down both edges of the adapter so that it would fit. I also had to cut a trace and solder it to another pin.
The data sent to the printer is in the format:
“GBP horizontal resolution of 160 pixels @ 2 bit/pixel greyscale
Each tile = 8 pixels * 8 pixels
20 tiles horizontal per band
2 bands per buffer”
It wasn’t clear to me that the data was in a checkerboard pattern. It starts from the top left. Follow the arrows to see how it’s setup. There are 20 tiles horizontal by 2 high per band and there are 2 bands. The whole thing is a buffer.
Each line is organized in a block of 8 pixels by 8 pixels: byte $FF, $00, $FF, $00, $FF, $00, $FF, $00 is equivalent to:
Important note: “The SIN pin (serial input TO Propeller) must be pulled up to VCC(5V) via a 15k resistor.”
Important note #2: You need to replace the section
CON

  _clkmode = xtal1 + pll16x

'  _xinfreq = 5_000_000            ' 80MHz

  _xinfreq = 6_000_000            ' 96MHz overclock

  _stack   = 50                   ' Ensure we have this minimum stack space available
with
CON

  _clkmode = xtal1 + pll16x

  _xinfreq = 5_000_000            ' 80MHz

'  _xinfreq = 6_000_000            ' 96MHz overclock

  _stack   = 50                   ' Ensure we have this minimum stack space available
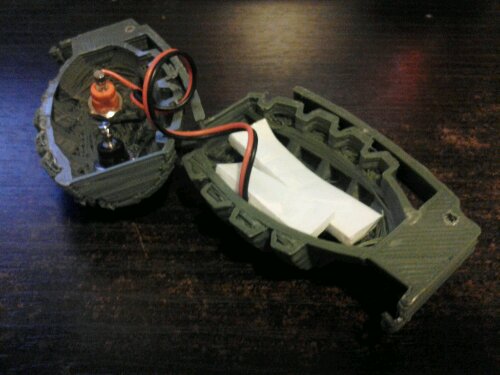
I made this project in about two hours. It is a mini volt meter from Adafruit in a 3D printed case in the shape of a grenade with banana jacks for connecting test leads or probes. It can be used to test batteries or circuits in electronics projects. It can read voltages from 3V to 30V DC.
I printed the two halfs of the grenade on my Makerbot Cupcake CNC. I got the 3d design file from Thingiverse. It’s “Hand Grenade” by Hairygael (Which is a derivative of “Hand Grenade” by MNinventer)
Bill of Materials
Mini Voltage Meter: $7.95 + shipping, from Adafruit
Banana Jacks: $6.19 + tax, from Frys Electronics
Olive Green 3mm ABS plastic: $17.75 + shipping (Only used less than about $0.50 worth), from 3dprinterstuff.com
I really like the technical challenge of this project. I personally don’t have a need for a perler bead “printer” but it’s an awesome concept, challenge and project.
I really like the gate idea or a variation on it. Such as the “looking ahead” idea, but look ahead let’s say four or five beads and planning the course based on that. It would take more processing power to plan that far ahead. A propeller probably could handle that.
I’m not sure what part of the 3D-printed disc is tapered. Could you please explain that a little better?
I agree with keeping it simple. I now realize that my idea would cost more in 3D printing time and cost more for multiple motors and bearings. Using servos and a radial coordinate system saves a lot of money. No need for precision rods, timing belts, stepper motors or pulleys. Using what bead you get and then choosing the closest place to put it seems much more efficient than I had assumed(incorrectly) from the description, “…to direct it toward the build surface or to a discard pile.â€
“Or we could run the sorting and placing tasks concurrently, with the placing task waiting on more beads when it runs out of a particular color.” If you could combine that with a method to move on to the next color and then come back to the color with the low number of beads when there is a sufficient amount in the hopper it may be even more efficient.
I think I might try a variation on my idea, just for sorting, maybe with skittles or m&ms. It seems like it’d be a fun project.
I’ve learned a lot from your post(Scanlime), for my own projects:
1) I need to figure out and decide what my goals and requirements are for projects before I start them.
2) There are many more ways than one to solve a problem. I need to think of all the possibilities first and not dismiss them so quickly.
3) I need to think more outside the box.
4) I should try to think of the extremes and not only within the limitations I see.
P.s. I realized that a lot of the really awesome projects I have seen on Hack a Day and Makezine blog have been made by you, Scanlime. Thank you for the awesome things you do and make!
I was looking at Scanlime’s( http://scanlime.org/) 3D Printed Vibrating Perler Bead Hopper: http://www.flickr.com/photos/micahdowty/5407791891/in/photostream/ and I was thinking how best to sort out the different color beads. I thought that if scanlime used one main hopper with the color sensor( http://www.flickr.com/photos/micahdowty/5447634276/ & http://www.sparkfun.com/products/8663 ) and one hopper for each color. There would need to be a way to put the bead in the correct hopper for each color. I was thinking that a rail and belt system like the X(maybe Y I don’t know) of a Reprap Mendel to move the main hopper/color sensor to the correct hopper. There would also need to be a tilting platform to drop the bead into the correct hopper for that color. I decided to make a 3d layout of my ideas.
Then I saw this photo( http://www.flickr.com/photos/micahdowty/5444740676/ ) and the description. “On the left, a sorting disc I’m testing. It mounts directly to a micro servo (press-fit onto the spline gear). It has a circular hole that can hold one bead while the robot examines its color, then at the proper time it can shuffle the bead off to one side or the other, to direct it toward the build surface or to a discard pile.” What bothered me was the, “…to direct it toward the build surface or to a discard pile.”” part. It seemes like an inefficient method to get the color you need.
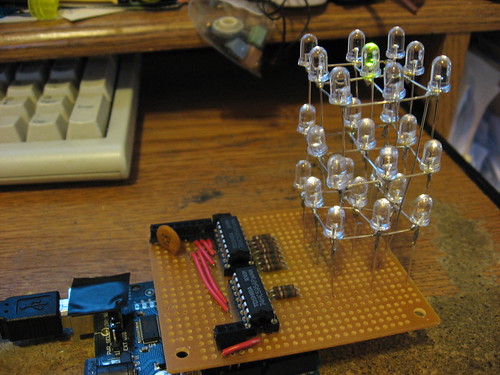
I decided that it was too hard to write animations for my LED Cube. So I wrote a Processing program to generate the code for it. All you have to do is load the program and click on the green LEDs(circles) to turn them on and when you are done with a frame of animation you click the orange button at the bottom then the code will be printed out to the console. Then you copy the code into the firmware and upload the program to the Arduino. Here is the program.
So I was watching Weekend Projects a about two and a half months ago and saw how to make a 3 by 3 by 3 LED cube. I thought, “Hey! I could do that with my Arduino!” and I did. Basically, I can turn any individual LED on or off.
I started with soldering together the LEDs in layers of nine. Then I played around with how to wire up a protoboard with two Shift Registers on it and the LEDs to make a Shield for the Arduino. The first try was messy. The second try was better but not ideal. The final wiring guide may LOOK messy, but it’s basically what I used.
The final wiring on the protoboard from the bottom is the last photo.
Hello all. I’m finally dusting off my old blog and plan to start posting again. I haven’t written since February. Wow. Nine whole months. We’ll see what actually happens.
Well it has been 30 days. In actuality, it was 44 days. As I said when I started the Napkin Count, I only counted days I ate fast food. I’ve learned when you are trying to count napkins, you rush yourself to eat it all before you forget how many napkins you had and how many are left. I felt sick eating so fast. All in all it was interesting, but I wouldn’t recommend it to anyone.
Now for some statistics:
Total Posts: 37
Total Fast Food Restaurants: 9
Top 5 Restaurants I ate at:
Taco Bell (11 times)
Carl’s Jr. (9 times)
Adalberto’s (7 times)
KFC A&W (4 times)
In-N-Out (2 times)
Top 3 Meals:
Large Number 1 Combo No Cheese with a Coke No Ice (6 times)
Carne Asada Burrito and a Jarritos Mandarina Soda (3 times)
Beef Crunchwrap Supreme and a Large Mountain Dew Baja Blast No Ice (2 times)
Top 3 Main Courses:
Beef Crunchwrap Supreme (11 times)
Famous Star, No Cheese (8 times)
Carne Asada Burrito (6 times)
Total Napkin Count: 192
Total Napkins Used: 90
Total Napkins Unused: 102
Highest Amount of Napkins for One Meal: 12
As you can see I proved my point to see if I got too many napkins or not enough. Obviously, there are way more napkins unused than were used.
Napkin Count: Day 30, 2/26/07
Restaurant: Taco Bell
Location: 4318 Marconi Ave. Sacramento, CA 95821 Near Eastern Ave.
Meal: Beef Crunchwrap Supreme and a Small Pepsi No Ice
Main Course: Beef Crunchwrap Supreme
Order Mistakes: None.
Napkin Count: 5
Napkins Used: 3
Napkins Unused: 2
Napkin Count: Day 29, 2/22/07
Restaurant: Jack in the Box
Location: 3500 Marconi Ave Sacramento, CA 95821 Near Watt Ave.
Meal: Number 9 Chicken Fajita Pita, Small Fries and a Small Coke No Ice
Main Course: Chicken Fajita Pita
Order Mistakes: None.
Napkin Count: 5
Napkins Used: 2
Napkins Unused: 3
I’m really tired of eating so much fast food. It kind of makes me sick to my stomach.